19c Database Patching Steps
Step 1: Download the Patches
Search for the following keywords on Oracle Metalink to download the CPU patches:
Critical Patch Update (CPU) Program JAN 2022
Critical Patch Update (CPU) Program APR 2022
Critical Patch Update (CPU) Program JUL 2022
Critical Patch Update (CPU) Program OCT 2022
Download the Latest OPatch Version:
Verify the current OPatch version:

I opened for the July patch, and here we need to click Patch
availability for Oracle products -> 3.1 Oracle database.

Oracle database (3.1) Many Oracle products patches are
listed here. I need only Oracle database patches. So, I'll go with the Oracle
database 3.1.7

My DB version is 19c So I will choose 3.1.7.3 Oracle
database 19c

Here I will download the below
database patch and grid patch (GI)
One interesting fact is that if
you download the GI Patch Database patch, it will also come under GI Patch. As
a result, there is no need to download a database patch separately.
Note: If you only apply the patch in Oracle Home, you
must download the database patch. Database Release Update
19.16.0.0.220719 Patch 34133642
GI Release
Update 19.16.0.0.220719 Patch
34130714,
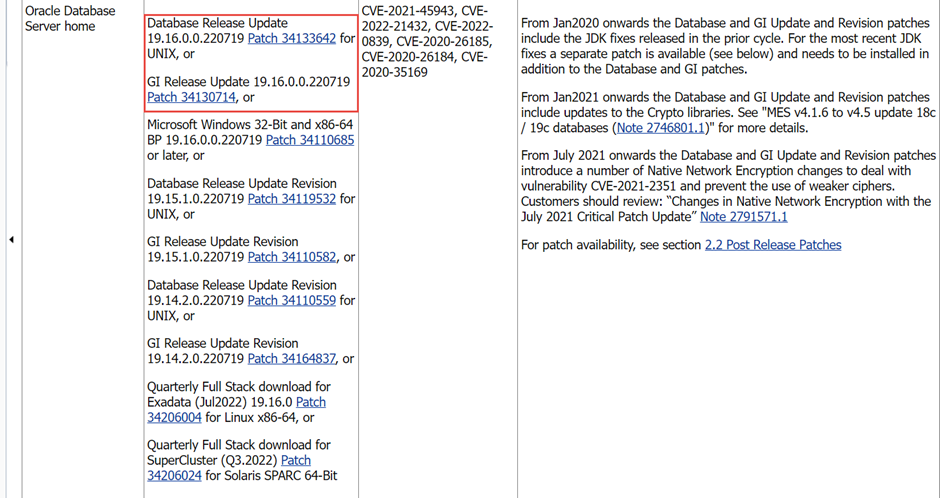
Captured below screenshot for GI Patch (34130714) read me
document. In this screenshot database patch also come under single GI patch

Download the Latest OPatch Version:
Verify the current OPatch version:
[oracle@oraclelab1 grid]$ OPatch/opatch version
OPatch Version: 12.2.0.1.17
OPatch succeeded.
If needed, download the latest OPatch:
File:
p6880880_122010_Linux-x86-64.zip
Step 2: Patch Analysis
Use the following commands to list applied patches:
$ORACLE_HOME/OPatch/opatch lspatches
$ORACLE_HOME/OPatch/opatch lsinventory
Step 3: Conflicts Check and System Space Check
Commands for conflict and space checks are applicable for both GI Home and Oracle Home:
Conflict Check:
$ORACLE_HOME/OPatch/opatch prereq CheckConflictAgainstOHWithDetail -phBaseDir /u01/patches/<PatchID>System Space Check:
$ORACLE_HOME/OPatch/opatch prereq CheckSystemSpace -phBaseDir /u01/patches/<PatchID>
Sample Conflict Check Command and output:
$ORACLE_HOME/OPatch/opatch prereq CheckConflictAgainstOHWithDetail -phBaseDir /u01/patches/34155589/34172231
$ORACLE_HOME/OPatch/opatch prereq CheckSystemSpace -phBaseDir /u01/patches/<PatchID>

Automated ASM Patching Steps
Automating ASM Patching with Opatch Auto
ASM patching can be fully automated using the OPatch auto command. This powerful tool handles everything, from shutting down the database, listener, and ASM instances, to applying patches in the Grid Home, Database Home, and running Datapatch. Finally, it starts up the database listener and ASM instance.
Note: Ensure that OPatch auto is executed by the root user only.
High-Level Steps for ASM Patching using Opatchauto:
Login as Root User: Ensure you have the necessary permissions.
Check Permissions for the Patch: Validate patch permissions.
Set Environment Variables:
root@oraclelab2 ~]# oraenv
ORACLE SID = [root] ? +ASM
The Oracle base has been set to /u01/app/oracle
export ORACLE_HOME=<ORACLE_HOME>
export ORACLE_SID=+ASM
export PATH=$PATH:$ORACLE_HOME/OPatch
Source the ASM: Prepare the ASM environment.
Apply the Patch:
root@oraclelab2 ~]# /u01/app/19.0.0.0/grid/0Patch/opatchauto apply /u01/patches/33509923
High-Level Steps for ASM Patching using Opatch:
Stop Database, Listener, and GI Home.
Grant Patch Directory Permissions.
Verify OPatch Version and Current Patches: Ensure no conflicts and adequate system space.
Apply Patch.
Perform Post-Patching Verification.
Restart Database, Listener, and GI Home.
Database Patching Steps:
Stop Database and Listener.
Grant Patch Directory Permissions.
Check OPatch Version and Current Patches: Ensure no conflicts and adequate system space.
Apply Patch.
Perform Post-Patching Verification.
Restart Database and Listener.
Detailed OPatch Apply Steps:
Navigate to Patch Directory:
cd /u01/patches/35943109
$ORACLE_HOME/OPatch/opatch apply
cd /u01/patches/35648918 $ORACLE_HOME/OPatch/opatch applyCheck Logs for Issues.
Verify Applied Patches:
$ORACLE_HOME/OPatch/opatch lspatches | grep -i 35943109
$ORACLE_HOME/OPatch/opatch lspatches grep -i 35648918
Common Steps for ASM & Database Patching: After applying the patches, check the registry to ensure all components are valid. If any component is invalid, contact Oracle support for assistance.

Post Patch Checks
Verify patch application using the registry:
SELECT PATCH_ID, PATCH_UID, ACTION, STATUS, ACTION_TIME, DESCRIPTION FROM dba_registry_sqlpatch;Run the datapatch utility:
cd $ORACLE_HOME/OPatch
./datapatch -verbose
Ensure no invalid objects are present
Frequently Used OPatch Commands
Find Applied Patches:
$ORACLE_HOME/OPatch/opatch lspatchesFind Inventory Details:
$ORACLE_HOME/OPatch/opatch lsinventoryFind OPatch Version:
$ORACLE_HOME/OPatch/opatch versionRollback a Patch:
$ORACLE_HOME/OPatch/opatch rollback -id <PatchID>

Comments
Post a Comment