Posts

Showing posts from 2022

oracleasm module not loaded or /dev/oracleasm not mounted

[root@oraclelab1 dev]# oracleasm createdisk ASM_DISK1 /dev/sdb1 oracleasm module not loaded or /dev/oracleasm not mounted. [root@oraclelab1 dev]# oracleasm status Checking if ASM is loaded: no Checking if /dev/oracleasm is mounted: no   [root@oraclelab1 dev]#   Load the oracleasm Module   [root@oraclelab1 dev]# oracleasm init Creating /dev/oracleasm mount point: /dev/oracleasm Loading module "oracleasm": oracleasm Configuring "oracleasm" to use device physical block size Mounting ASMlib driver filesystem: /dev/oracleasm       Verify the oracleasm configuration   [root@oraclelab1 dev]# df -ha |grep -i oracleasm oracleasmfs             0     0     0    - /dev/oracleasm [root@oraclelab1 dev]# [root@oraclelab1 dev]# lsmod |grep oracleasm oracleasm              65536  1     Create Diskgroup oracleASM   [root@oraclelab1 dev]# oracleasm createdisk ASM_DISK1 /dev/sdb1 Writing disk header: done Instantiating disk:

How to apply Patch in OTM Application

  OTM Patching Steps Step 1: Download the required patch and unzip at location:"/apps/patch/OTMPATCHES" Step 2: Shutdown the OTM application services Step 3: Go to patch directory where the patch is unziped. Step 4: Run the command " Java -jar <filename> " Step 5: Check for any errors and fix it as per instructions. Step 6: Start the OTM application services and test. Patching Rollback steps: Step 1: Shutdown the application Step 2: Go to patch directory where jar file is located. Step 3: Run the command " java -jar <filename> uninstall " Step 4: Check for any errors or special instructions. Step 5: Start the application. How to check patch applied status in OTM /apps/applmgr/otm643/otm/glog/config [applmgr@otm_lab config]$ cat glog.patches.properties |grep 29134625 installed_patch=otm643_quickpatch_29134625 (29134625)

How SQL statements Works in oracle

Connect the instance using User process and server process Once Basic validation completed SQL statement ready to execute Syntax Check Semantics check Shared pool check Syntax Check: The database validates the sql query syntax is correct or not. Example: SQL> select from dba_objects; select from dba_objects        * ERROR at line 1: ORA-00936: missing expression SQL> Semantics check Oracle Verify all column and table names using the dictionary, and confirm that you have permission to see the data. Shared pool Check Once syntax and semantics check done the server processer will initiate the sql query. Server process will check the library cache In the Library cache server process will check Most recently user to the least recently used algorithm for match the sql statement. If library cache matches the sql statements that’s called soft parsing If there is no match, the server process must continue with the creation of the execution plan hard p

How to create Big File tablespace in 19c Database.

Image
Bigfile tablespce: A bigfile tablespace is made up of a single data or temporary file that can be up to 128 TB in size. Maximum Datafile size for BIG File normal table space DB Block Size Maximum Data file Size 2k 4194303 *2k Block Size=8 TB 4k 4194303 *4k Block Size=16 TB 8k 4194303 *8k Block Size=32 TB 16k 4194303 *16k Block Size=64 TB 32k 4194303 *22k Block Size=128 TB Creating bigfile tabl

How to create Pfile from memery in 19C database

Image
 Create Pfile/Spfile from memory new fecture from 11gR1 SYNTAX:- SQL> create pfile from memory; Reference: http://sanjeevvellaisamydba.blogspot.com/2019/01/oracle-pfile-spfile-overview.html Why does create PFILE|SPFILE from MEMORY output differ from that of SPFILE|PFILE? (Doc ID 784133.1)

How to Rename PDB Database in 19c Database

Image
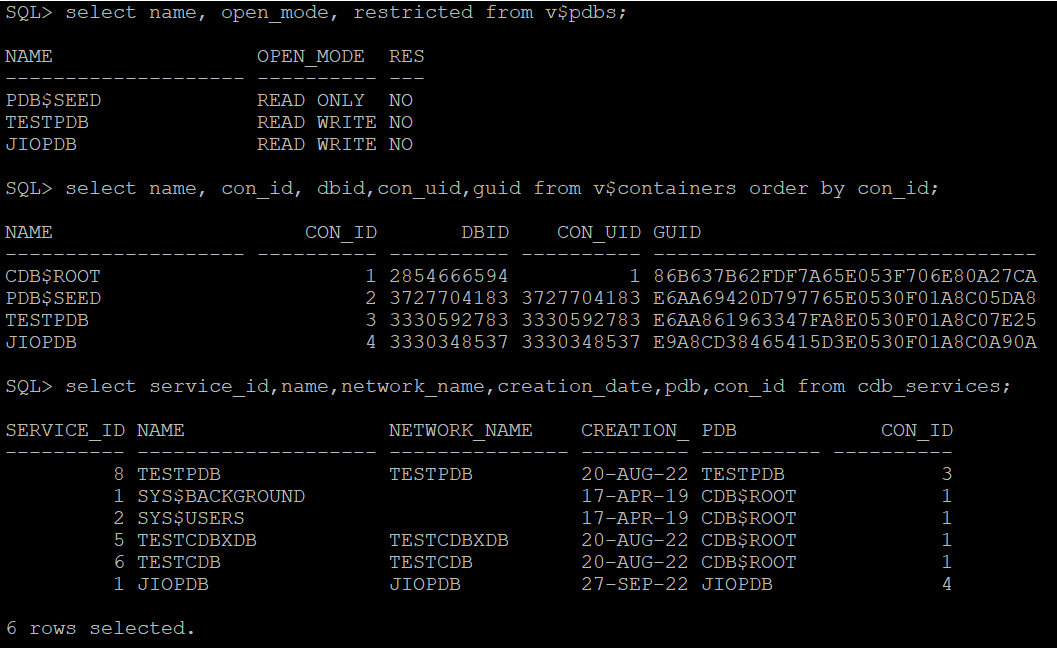
Summary    Here I will rename JIOPDB to AIRTELPDB   Connect to the CDB and check the information about the PDB first Open PDB in restricted mode. Rename the PDB. You must be connected to the PDB to rename it. Close and open the PDB.     Connect to the CDB and check the information about the PDB first   SQL> select name, open_mode, restricted from v$pdbs; SQL> select name, con_id, dbid,con_uid,guid from v$containers order by con_id; SQL> select service_id,name,network_name,creation_date,pdb,con_id from cdb_services;   Open PDB in restricted mode   SQL> select name, open_mode, restricted from v$pdbs;   NAME                  OPEN_MODE   RES -------------------- ---------- --- PDB$SEED              READ ONLY   NO TESTPDB               READ WRITE NO JIOPDB                 READ WRITE NO   SQL> alter pluggable database JIOPDB close;   Pluggable database altered.   SQL> alter pluggable database JIOPDB open restricted;  

How to DROP PDB Database in 19c

Image
We can Use the  DROP PLUGGABLE DATABASE  statement to drop a pluggable database (PDB). When you drop a PDB, the control file of the multitenant container database (CDB) is modified to remove all references to the dropped PDB and its data files. Archived logs and backups associated with the dropped PDB are not deleted. You can delete them using Oracle Recovery Manager (RMAN), or you can retain them in case you subsequently want to perform point-in-time recovery of the PDB. We can't rollback the  DROP PLUGGABLE DATABASE  statement. Drop pluggable Database include database: SYNTAX:-   DROP PLUGGABLE DATABASE <PDB_NAME> INCLUDING DATAFILES;   SQL> show pdbs       CON_ID CON_NAME          OPEN MODE   RESTRICTED ---------- ------------------------------ ---------- ----------          2 PDB$SEED                      READ ONLY   NO          3 TESTPDB                         READ WRITE NO          4 DEVPDB                          READ WRITE NO SQL>

How to create PDB Database in 19c

Image
Summary   Create a PDB from the seed PDB Verify the status, open mode, and service names of the PDBs List the PDB data files.   Create a PDB from the seed PDB   Syntax:-   create pluggable database <PDB_NMAE> admin user <Admin_Username> identified by <Password>;   [oracle@oraclelab1 ~]$ sqlplus / as sysdba   SQL*Plus: Release 19.0.0.0.0 - Production on Sat Sep 24 08:56:57 2022 Version 19.3.0.0.0   Copyright (c) 1982, 2019, Oracle.   All rights reserved.   Connected to: Oracle Database 19c Enterprise Edition Release 19.0.0.0.0 - Production Version 19.3.0.0.0   SQL> show pdbs       CON_ID CON_NAME                        OPEN MODE   RESTRICTED ---------- ------------------------------ ---------- ----------          2 PDB$SEED                        READ ONLY   NO          3 TESTPDB                         READ WRITE NO   SQL> create pluggable database DEVPDB admin user sanjeev identified by dba;   Plugga

How to create ASM Disk group in Oracle 19C Database

Image
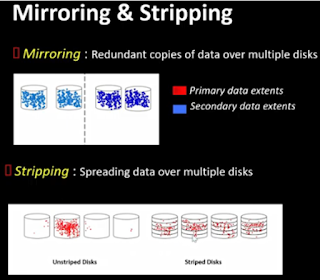
  In this post will see types of disk groups and how to create disk group, altering & delating disk group   Types of Disk groups   Normal: Uses two-way mirroring. A normal redundancy disk group requires a minimum of two disk devices (or two failure groups).   External: Choosing not to use ASM mirroring of files   High: Uses three-way mirroring of Oracle ASM metadata and user data. A high redundancy disk group requires a minimum of three disk devices (or three failure groups). The effective disk space in a high redundancy disk group is one-third the sum of the disk space in all of its devices. A high redundancy disk group can tolerate two failures.   SYNTAX:-   CREATE DISKGROUP <DISKGROUP_NAME> REDUNDANCY DISK<'OSDISK_LOCATION'> NAME <FAILGROUP_NAME>;   What is mirroring & stripping?   Mirroring: Redundant copies of the data over multiple disks.     Stripping : Spreading the data over multiple disks. EXTERNAL REDUNDA